Development Environments
We use a Docker-based container management system called Lando to manage development environments. Lando allows new developers to get started quickly and helps share changes in the build ecosystem. To spin up a development environment, you'll (roughly) need to follow these steps:
Windows
Windows developers are encouraged to use WSL for the a developer experience most consistent with other platforms. Our WSL notes may prove useful if configuring WSL for the first time.
- Download and Install Lando and its dependencies.
- Checkout the Pilcrow repository on your local machine.
- From the project root run,
lando start.
Lando will then download the appropriate containers and get everything spun up. Once everything is installed and running, you should see:
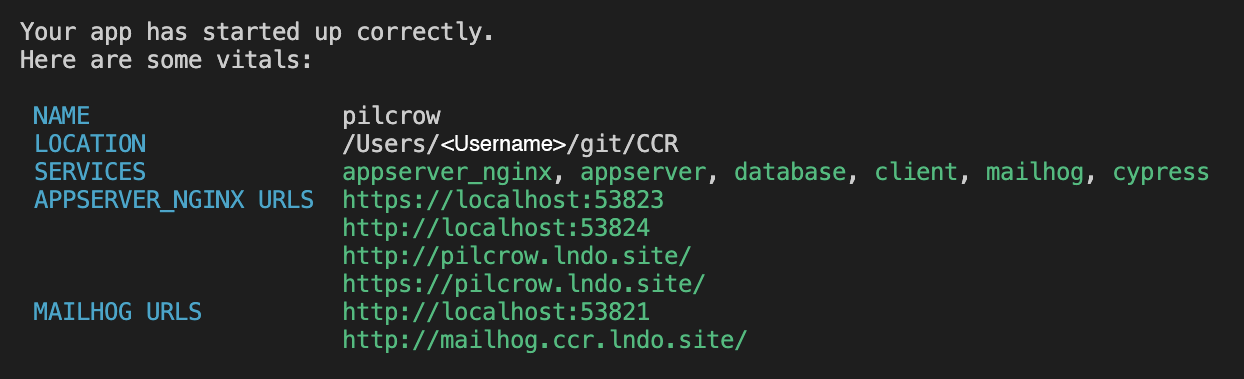
You can then open a browser to https://pilcrow.lndo.site/ and view the project running on your local machine.
Lando commands
Lando has built-in tooling commands that allow a developer to run commands inside a container from their terminal.
lando artisan: Run Laravel's artisan command in the appserver container.lando composer: Run composer in the appserver container.lando yarn: Run yarn in the client container.lando mysql: Start a MySQL client session (TIP: uselando mysql laravelto start with the Pilcrow database selected).lando quasar: Run the quasar cli inside the client container.lando extras: Manage and install tools into.lando.local.yml.lando pandoc: Run pandoc inside the appserver container
There are other useful tooling commands available. To view a list of all commands available, run lando at your command prompt with no arguments.
TIP
Lando tooling commands will run inside the container in your current working directory. Therefore, you should be careful to run tools (composer, yarn, etc.) inside the appropriate directory, or you may end up inadvertently creating a new composer.json or package.json in a different part of the project. The only exception to this is the lando quasar command, which always runs in the /client directory.
Developer Experience
Out of the box, the Lando developer experience is excellent, but there are a few things that can make it just a little bit better.
VSCode Workspace
Our multiroot workspace can make it easier to use certain extensions that don't support our monorepo structure:
code pilcrow.code-workspaceLando Extras
You can create local containers or additional tooling commands by creating a .lando.local.yml file. This file is gitignored by default in our repository, so you can use it for your personal customizations to the development environment.
Some containers are useful for specific development tasks but would unnecessarily bloat the development stack for day-to-day usage. Our lando extras tooling command eases the friction associated with managing your .lando.local.yml file. Run lando extras for a list of templates and instructions to enable and disable extras.
Testing Mail
One of the extras available is MailHog. MailHog can capture mail to aid debugging of email messages. To enable MailHog:
lando extras enable mailhog

lando rebuild
The MailHog interface will be available at http://mailhog.pilcrow.lndo.site/ once the rebuild has finished. Pilcrow's development environment will automatically route outgoing mail to MailHog's SMTP interface.
Mailhog Resources
If you don't need to debug the appearance of mail output, you can use the log mail driver to log mail output. This can save the extra resources needed to run the MailHog container. See the Laravel documentation for more information.
Trust the Lando CA
Lando creates an SSL certificate that it will use to sign the certificates it generates. This also means that you can trust this CA certificate to avoid browser security warnings.
Database Migration and Seeding
The lando setup does not automatically migrate or seed database tables. Our development seeders include several test account for convenience. Once seeding is complete, you can log in using any one of the sample users defined in backend/database/seeders/UserSeeder.php.
# Clear migrate and seed
$ lando artisan migrate:fresh --seed
# :fresh drops all tables before migrating;
# --seed will run the seeders after migrations complete

# Clear and migrate
$ lando artisan migrate:fresh

# Migrate only
$ lando artisan migrate
# Use this command to update your existing database with any new migrations.
External Identity Providers (Optional)
Pilcrow supports the registration and authentication of user accounts with external identity providers via SocialiteProviders. Keep in mind, you will need to register redirect URLs with any providers you intend to allow users to use on your instance of Pilcrow.
Enable Provider Buttons
Login buttons for external identity providers will appear on the Login page (/login ) after adding values for the environment variables related to external providers in the environment file (/backend/.env). Currently, ORCID and Google are supported. Users will be able to both register and authenticate with these providers using these buttons.
Register Redirect URLs
Register a "redirect URL" with the provider(s) you intend to allow users to use on your instance of Pilcrow. Once you have a redirect URL registered with that provider, update /backend/.env with information pertaining to that provider.
ORCID
Documentation from ORCID for registering a redirect URL: https://info.orcid.org/documentation/api-tutorials/api-tutorial-get-and-authenticated-orcid-id/#h-register-your-redirect-urls
ORCID_CLIENT_ID=$YourOrcidClientID
ORCID_CLIENT_SECRET=$YourOrcidClientSecret
ORCID_REDIRECT_URL="${APP_URL}/auth/redirect/orcid"
ORCID_ENVIRONMENT="production"
Google
Documentation from Google for establishing a Google Cloud application for OAuth and registering a redirect URL (or an "Authorized Redirect URI"): https://support.google.com/cloud/answer/6158849?hl=en
GOOGLE_CLIENT_ID=$YourGoogleClientId
GOOGLE_CLIENT_SECRET=$YourGoogleClientSecret
GOOGLE_REDIRECT_URI="${APP_URL}/auth/redirect/google"
WSL Developer Notes
This pages has instructions and tips for developing Pilcrow using the Windows Subsystem for Linux (WSL).
Prerequisites
- WSL2 is installed and configured along with your preferred Linux distribution
Windows Setup
- Install Docker Desktop for Windows
- Make sure WSL integration is turned on (it should be on by default).
- Restart windows (you may experience Docker crashing on startup until a restart)
WSL Setup
- Use the script from docker.com to install Docker Community Edition (
docker-ce) in WSL. https://get.docker.com- Ignore the warning about WSL. You need both the Windows Docker Desktop and the Linux Community Edition package.
docker-ceis a required as a dependancy for the lando package
- Install the
landopackage for your distribution. - Proceed with the Pilcrow setup (see the project README.md file)
- Make sure that you put the Pilcrow repo inside the WSL filesystem!
- Accessing the Windows filesystem from WSL will slow things down considerably.
Tips
- VS Code will automatically detect Docker is running and will suggest some extensions
- If you're using VS Code, install the
Remote Developmentextension from Microsoft to make it easier to edit files in WSL. This will install the following extensions- Remote Containers
- Remote WSL
- Remote SSH
- To access Pilcrow with VS Code under WSL, make sure to start VS code from WSL.
cd <PILROW_HOME>; code .